Want to know the best Overwatch 2 Stadium tank builds? The backbone of any strong Overwatch team is usually linked to the strength of the squad's tank. The perfect tank strikes a balance between soaking up damage and landing crucial kills, but you can't do this without the right Overwatch 2 Stadium tank builds.
We've looked through all the items and powers on offer to create the best multiplayer game to earn the praise and adoration of your teammates.
Junker Queen Stadium tank build
Junker Queen is fantastic at soaking up damage, but she can also be a great asset as a tank/ hybrid by utilizing our Junker Queen Stadium tank build to drastically upgrade her Commanding Shout ability.
Junker Queen Tank build powers
Here are the powers you should aim to pick up as Junker Queen:
- Round 1: Let's Go Win
- Round 3: Reckoner's Roar
- Round 5: Royal Bullets
- Round 7: Twist The Knife
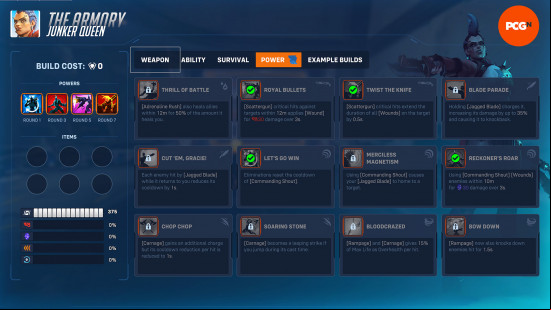
Due to Junker Queen's tendency to land eliminations without delivering the final blow, Let's Go Win is the perfect first round pick as it resets the cooldown of Commanding Shout whenever you land an elimination. Early on, you might not be able to get most from this power, but as you continue to acquire more items, you will be able to spam Commanding Shout multiple times in the same fight to keep your team alive.
Things really begin to heat up in round three when we get the chance to pick up Reckoner's Roar, giving Commanding Shout the ability to damage enemies within 10m with wounds, dealing 30 damage over three seconds. Again, in isolation this might not seem like a big deal, but when combined with Let's Go Win, you're going to end up hurting some enemies even if you're not focused on them.
Wounds are crucial to this build, but we'll go into more detail in the items section. For our round five pick, we've selected Royal Bullets which gives Junker Queen the chance to apply wounds if you land a critical hit using your Scattergun. These wounds also apply 30 damage over three seconds, and this damage really starts to stack up when used alongside Commanding Shout.
To complete the build, go with Twist The Knife to extend the length of all wounds on the target by 0.5s, the only downside is that you need to land a critical hit using Scattergun.
Junker Queen Tank build items
Junker Queen's large health pool and her ability to self-heal means we can focus on extracting value from Commanding Shout. These items help to keep your team alive by making this ability more effective, and we're also looking to gain value from all those wounds we're able to apply.
Here are the items you should aim to pick as Junker Queen:
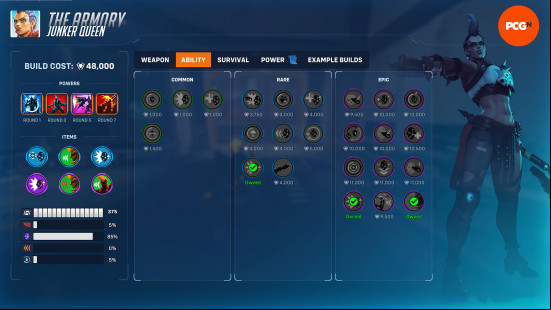
- Ironclad Exhaust Ports – Costs 4,000, Rare, Survival
- Monarch's Decree – Costs 4,000, Rare, Weapon
- Nano Cola – Costs 5,500, Rare, Ability
- Champion's Kit – Costs 13,500, Epic, Ability
- Booming Voice – Costs 11,000, Epic, Ability
- Shred and Lead – Costs 10,000, Epic, Weapon
It's worth picking up Ironclad Exhaust Ports as soon as you can afford it, giving you 25 overhealth for three seconds whenever you use an ability. It also comes with a 5% cooldown reduction on Jagged Blade, Commanding Shout, and Carnage. Pair this with Monarch's Decree for 5% weapon power, as well as 15% attack speed whenever you use Commanding Shout.
Next up is Shred and Lead, powering up your Scattergun by supplying it with 33% max ammo, 10% weapon lifesteal, and a 10% attack speed buff that lasts four seconds whenever Junker Queen wounds someone, stacking up to three times. As long as you're hurting enemies with Scattergun, you'll be able to activate Commanding Shout often, providing you with both an attack speed buff and additional health.
Nano Cola adds 20% ability power to Jagged Blade, Carnage, Rampage, and Commanding Shout, and you can build on this with Champion's Kit once you can afford it to add 40% ability power, taking you up to 60%. It doesn't stop there, as we can purchase Booming Voice to give us 25% ability power, and increase the radius of Commanding Shout by 50%, affecting any allies who are out of your line of sight.
Reinhardt Stadium tank build
Reinhardt has always been a fantastic tank when it comes to mitigating damage, and now you can transform him into an effective healer while performing your shielding duties using the best Reinhardt Stadium tank build.
Reinhardt tank build powers
Here are the powers you should aim to pick up as Reinhardt:
- Round 1: To Me, My Friends!
- Round 3: Wilhelmwagen
- Round 5: Barrier Reconstruction
- Round 7: Amplification Barrier
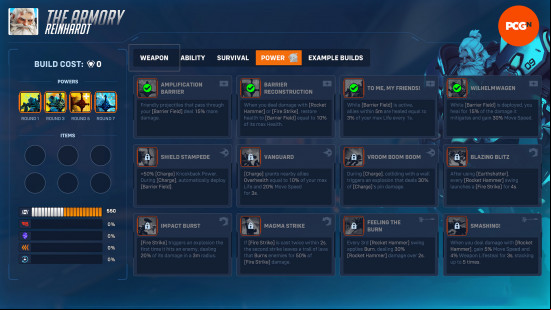
Take Reinhardt's protective skills to the next level by picking To Me, My Friends! in round one, giving you the ability to heal allies within 5m equal to 3% of your max life every second. This effect continues to strengthen as you progress through the rounds thanks to the items we've picked out, turning your barrier into an effective healing aura.
Since Barrier Field is at the core of our build, there will be times when your barrier runs dry, forcing you to tend for yourself while it regenerates. Wilhelmwagen is the natural third round pick, synergizing well with To Me, My Friends!, this time providing you with healing. You're healed by 15% of the damage your barrier mitigates, and you also gain 30% move speed in the process. This should keep you topped up with health whenever your barrier goes down, giving you enough time to escape to safety.
During the moments you're forced to fight, Barrier Reconstruction will help you bring your shield back online, restoring health to your Barrier Field equal to 10% of its max health whenever you deal damage with Rocket Hammer or Fire Strike. You're likely to land a hit with Fire Strike just by launching in the general vicinity of the opposing team, and if someone makes decides to get close to you, smash them with your hammer to top up your shield.
Amplification Barrier turns Reinhardt into Baptiste, giving your allies a 15% damage boost to any projectiles that through your shield. Considering how close your teammates need to be to get healed by your shield, you're bound to get a lot of value from this power.
Reinhardt tank build items
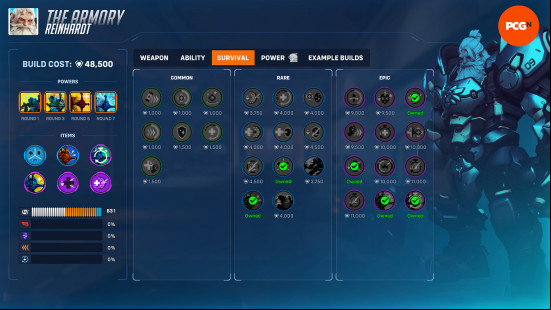
Here are the items you should aim to pick as Reinhardt:
- Overclocked Barrier – Costs 4,000, Rare, Survival
- Meka Z-Series – Costs 5,000, Rare, Survival
- Phoenix Protocol – Costs 10,000, Epic, Survival
- Infusion Generator – Costs 10,000, Epic, Survival
- Rüstung Von Wilhelm – Costs 10,000, Epic, Survival
- Divine Intervention – Costs 10,000, Epic, Survival
, To Me, My Friends! scales with your total health, so we're aiming to increase your health pool as the rounds progress. For the low price of just 4,000, you can greatly enhance your Barrier Field using Overclocked Barrier, providing you with 25 health, and upgrading your barrier's health and size by 25%. It's also worth picking up Meka Z-Series to increase your health, armor, and shields by 8% to make your opponents work to drain your life.
Take your protection powers further using Phoenix Protocol to regenerate Barrier Field 50% faster and activate its regeneration 50% sooner after it's destroyed. It also gives you an extra 25 health, making your healing ability more effective. Infusion Generator turns you into a real problem by increasing Barrier Field's health by 100% of your max life, and add another 25 health to your total life. Fortify yourself using Rüstung Von Wilhelm to bolster your health, armor, and shields by a blistering 15%, and gain 10% damage reduction while below 30% life.
Finally, Divine Intervention gives you a lifeline in those moments of weakness when your barrier breaks, providing you with 50 shields, and restoring 15% of damage taken while also regenerating your shields whenever you take more than 100 damage at once. This is particularly useful in the late game when DPS heroes start to stack up the damage buffs, making it easy to trigger that 100 damage threshold.
There you have it, the best Overwatch 2 Stadium tank builds available right now. If you get sick of protecting your team, give our free PC game.

